21. 윈도우 계산기 - 기초 UI 구현

01. Calculator 예제 준비하기
01.1 타겟 분석

"윈도우 계산기 스크린샷" 을, 그림판으로 확안하면
너비와 높이를 간단하게 확인 할 수 있습니다.
322 * 534px
하지만 위의 높이와 너비 속성값을 적용하면 문제가 발생합니다.
이 문제에 대해 잠시 살펴봅니다.
01.2 WPF 높이와 너비 테스트 확인 준비

Height="100" Width="322"<Grid>
<Button Height="32"/>
</Grid>
01.3 XAML Live Preview

01.4 오차 확인


XAML 높이와 너비를, Height="100" Width="322" 으로 세팅했을 때,
Height 값은 93 (-7)
Width 값은 308 (-14)
값이 차이가 난다는 것을 확인할 수 있다.
이는 WindowStyle 3D border 속성이 렌더링 될 때, 외곽선 및 그림자로 인해 발생된다.
01.5 정확한 사이즈 맞춰보기

       WindowStyle="None"
       ResizeMode="NoResize"
위 속성을 적용하면 정확한 높이와 너비 값으로 설정된다.
하지만 Title Bar 및 Border 를 직접 만들고 적용시켜야 한다.
01.6 수동으로 조정하기

디버깅 모드에서, XAML Live Preview에서 값을 확인하며 높이와 너비를 조정한다.
Height="541" Width="336"
02. Calculator 예제 준비하기
02.1 분석
윈도우 계산기를 만들기위해 간단하게 레이아웃을 잡아보면
1) 높이 속성값은 541, 너비는 336
2) x축, 버튼 4개, 마진 5개
3) y축, 로우 10개, 마진 11개
02.2 WPF 프로젝트 생성

02.3 Title, Height, Width 속성 수정
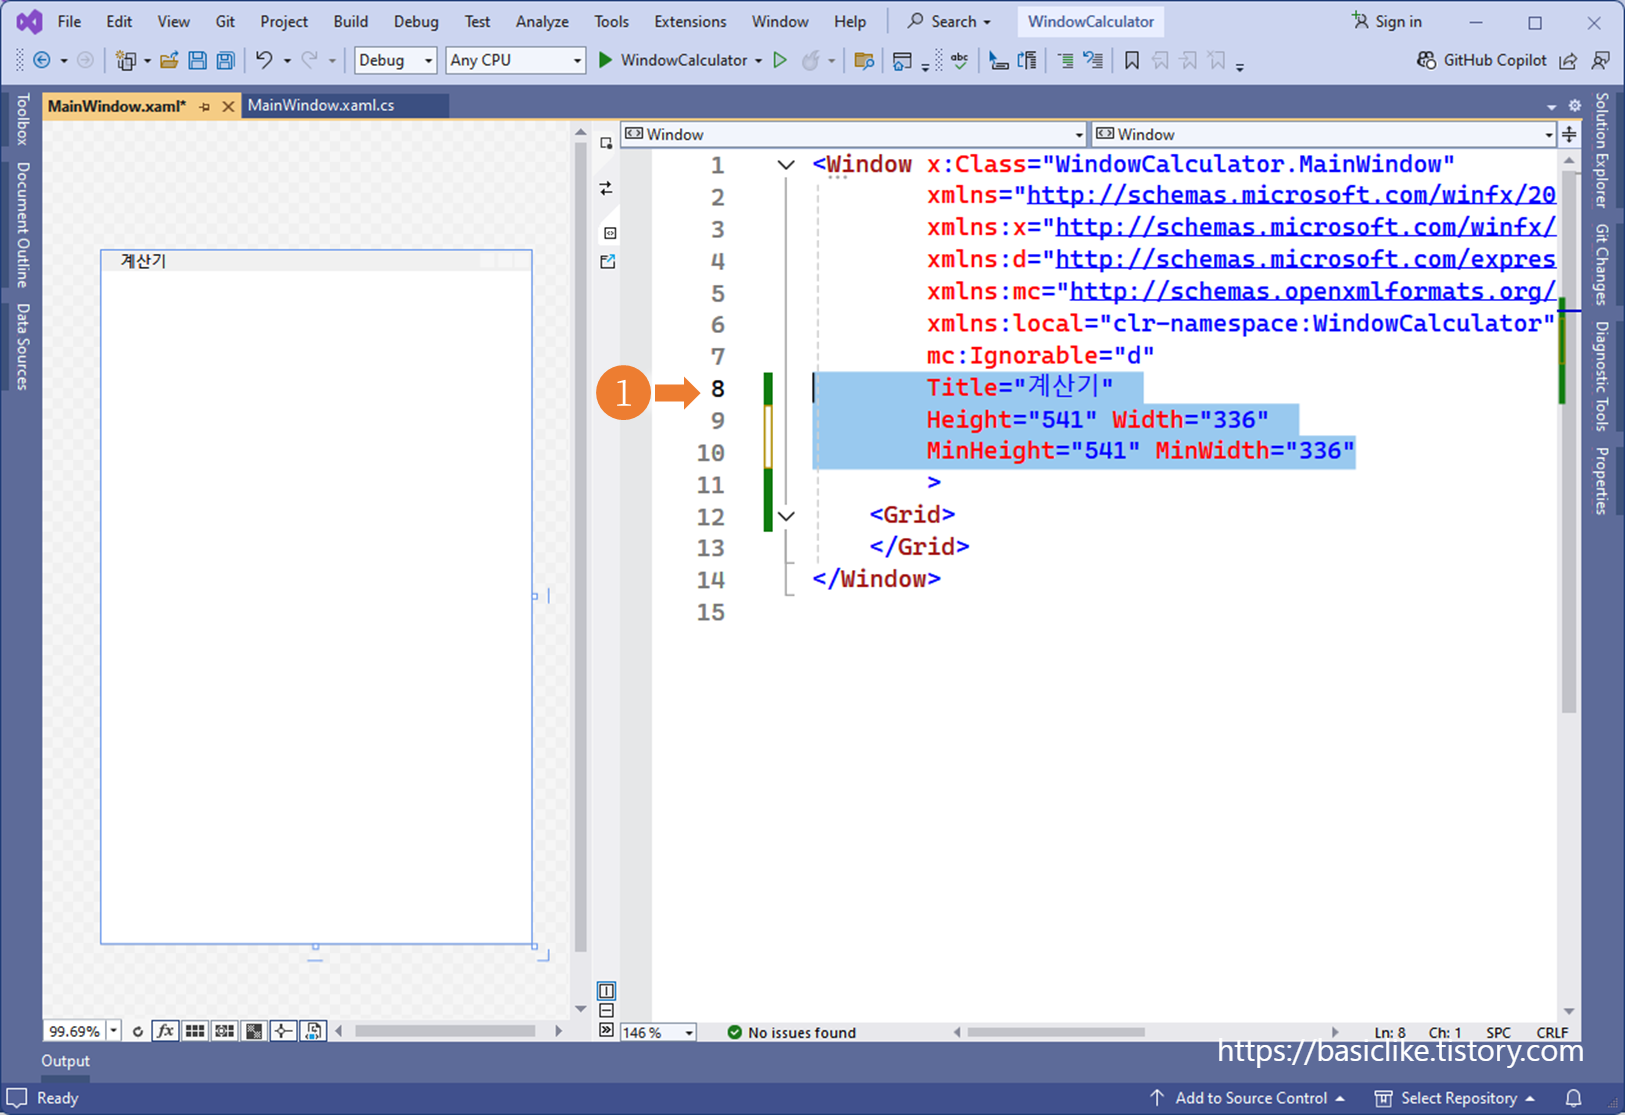
① XAML 소스코드에서 타이틀, 높이, 너비 속성값 변경
Title="계산기"
Height="541" Width="336"
MinHeight="541" MinWidth="336"
02.4 Grid Panel 속성 추가

<Grid.ColumnDefinitions>
    <ColumnDefinition Width="2" />
    <ColumnDefinition Width="*" />
    <ColumnDefinition Width="2" />
    <ColumnDefinition Width="*" />
    <ColumnDefinition Width="2" />
    <ColumnDefinition Width="*" />
    <ColumnDefinition Width="2" />
    <ColumnDefinition Width="*" />
    <ColumnDefinition Width="2" />
</Grid.ColumnDefinitions>
<Grid.RowDefinitions>
    <RowDefinition Height="2" />
    <RowDefinition Height="0.6*" />
    <RowDefinition Height="2" />
    <RowDefinition Height="0.6*" />
    <RowDefinition Height="2" />
    <RowDefinition Height="1.6*" />
    <RowDefinition Height="2" />
    <RowDefinition Height="0.6*" />
    <RowDefinition Height="2" />
    <RowDefinition Height="*" />
    <RowDefinition Height="2" />
    <RowDefinition Height="*" />
    <RowDefinition Height="2" />
    <RowDefinition Height="*" />
    <RowDefinition Height="2" />
    <RowDefinition Height="*" />
    <RowDefinition Height="2" />
    <RowDefinition Height="*" />
    <RowDefinition Height="2" />
    <RowDefinition Height="*" />
    <RowDefinition Height="2" />
03. Calculator 예제 준비하기
03.1 레이블 컨트롤 추가

① 계산 결과가 문자로 출력될 레이블을 추가하고, 속성값을 세팅.
        <Label x:Name="resultLabel"
               Content="0"
               HorizontalAlignment="Right"
               VerticalAlignment="Center"
               FontSize="46"
               Grid.ColumnSpan="7"
               Grid.Row="5"
               Grid.Column="1" />
03.2 버튼 컨트롤 추가

<!-- % 라인 9.1 -->
<Button x:Name="percentButton"
        Content="%"
        FontSize="16"
        Grid.Row="9"
        Grid.Column="1"
        />
<Button x:Name="ceButton"
        Content="CE"
        FontSize="16"
        Grid.Row="9"
        Grid.Column="3"
        />
<Button x:Name="clearButton"
        Content="C"
        FontSize="16"
        Grid.Row="9"
        Grid.Column="5"
        />
<Button x:Name="deleteButton"
        Content="⌦"
        FontSize="14"
        Grid.Row="9"
        Grid.Column="7"
        />
03.3 버튼 컨트롤 추가
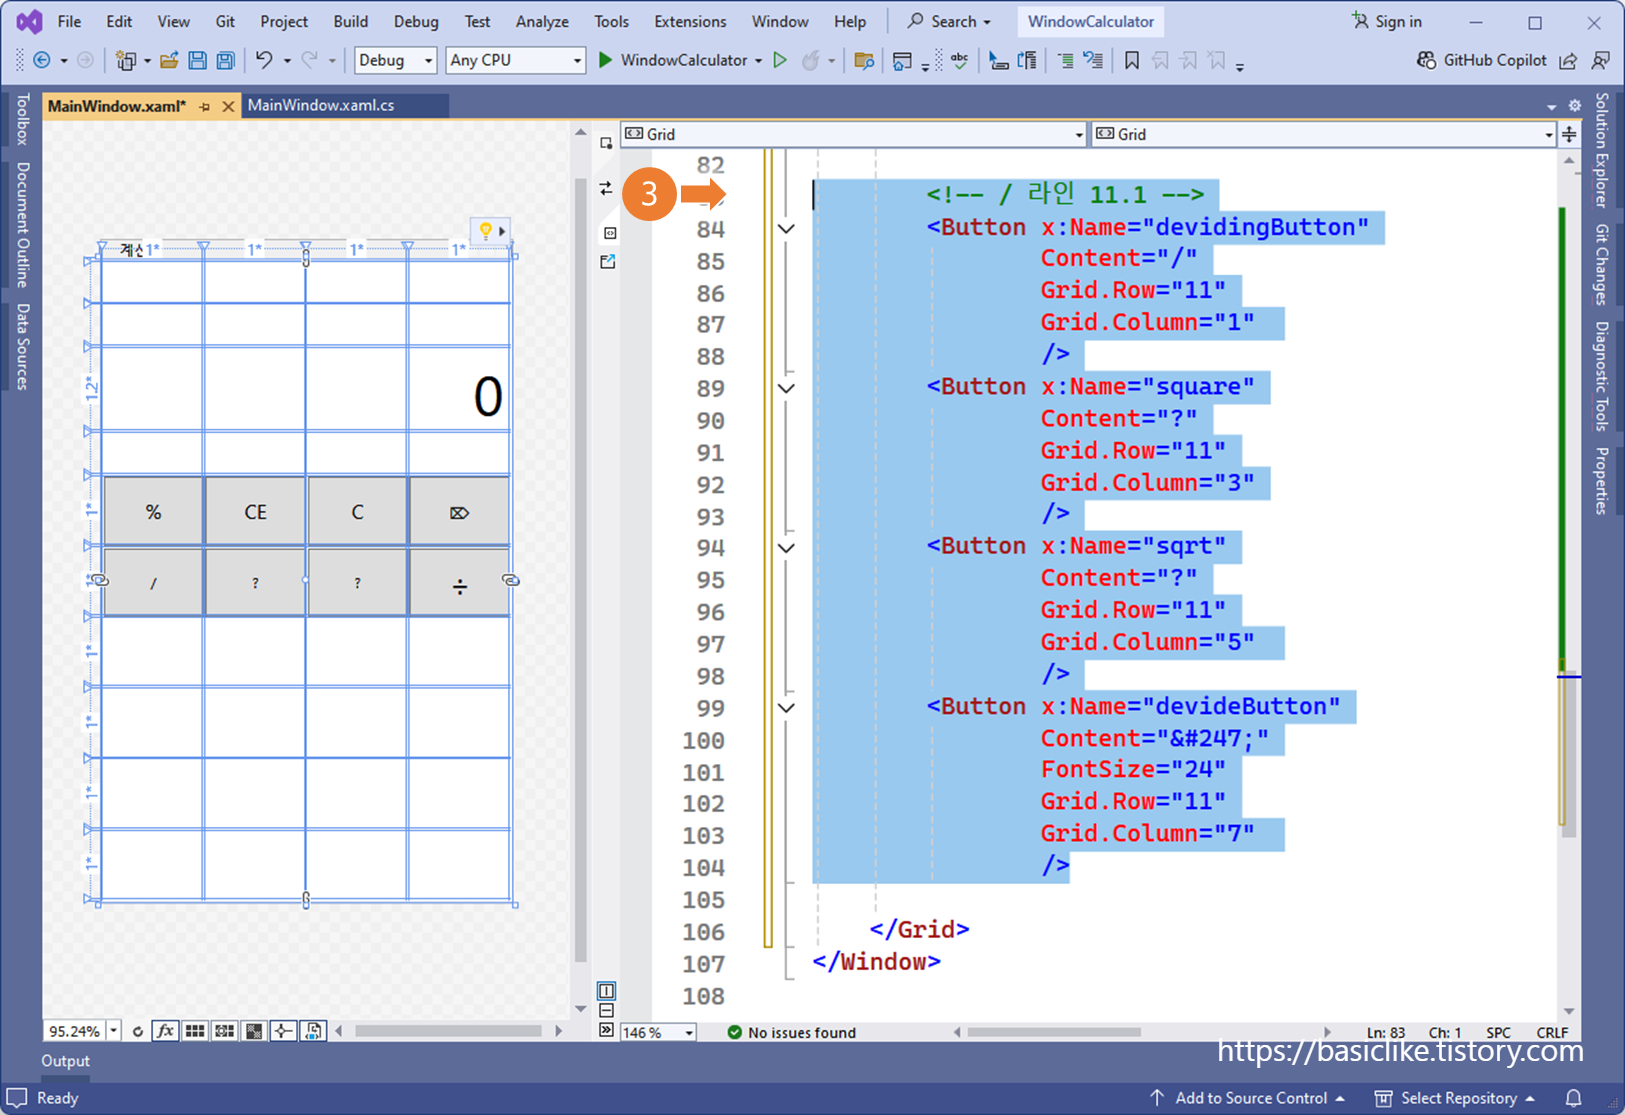
<!-- / 라인 11.1 -->
<Button x:Name="devidingButton"
Content="/"
Grid.Row="11"
Grid.Column="1"
/>
<Button x:Name="square"
Content="?"
Grid.Row="11"
Grid.Column="3"
/>
<Button x:Name="sqrt"
Content="?"
Grid.Row="11"
Grid.Column="5"
/>
<Button x:Name="devideButton"
Content="÷"
FontSize="24"
Grid.Row="11"
Grid.Column="7"
/>
03.4 버튼 컨트롤 추가

<!-- 7 라인 13.1 -->
<Button x:Name="sevenButton"
Content="7"
FontSize="18"
Grid.Row="13"
Grid.Column="1" />
<Button x:Name="eightButton"
Content="8"
FontSize="18"
Grid.Row="13"
Grid.Column="3" />
<Button x:Name="nineButton"
Content="9"
FontSize="18"
Grid.Row="13"
Grid.Column="5" />
<Button x:Name="multiplicationButton"
Content="✕"
FontSize="16"
Grid.Row="13"
Grid.Column="7" />
03.5 버튼 컨트롤 추가

        <!-- 4 라인 15.1 -->
        <Button x:Name="fourButton"
                Content="4"
                FontSize="18"
                Grid.Row="15"
                Grid.Column="1" />
        <Button x:Name="fiveButton"
                Content="5"
                FontSize="18"
                Grid.Row="15"
                Grid.Column="3" />
        <Button x:Name="sixButton"
                Content="6"
                FontSize="18"
                Grid.Row="15"
                Grid.Column="5" />
        <Button x:Name="minusButton"
                Content="-"
                FontSize="18"
                Grid.Row="15"
                Grid.Column="7" />
03.6 버튼 컨트롤 추가

        <!-- 1 라인 17.1 -->
        <Button x:Name="oneButton"
                Content="1"
                FontSize="18"
                Grid.Row="17"
                Grid.Column="1" />
        <Button x:Name="twoButton"
                Content="2"
                FontSize="18"
                Grid.Row="17"
                Grid.Column="3" />
        <Button x:Name="threeButton"
                Content="3"
                FontSize="18"
                Grid.Row="17"
                Grid.Column="5" />
        <Button x:Name="plusButton"
                Content="+"
                FontSize="18"
                Grid.Row="17"
                Grid.Column="7" />
03.7 버튼 컨트롤 추가
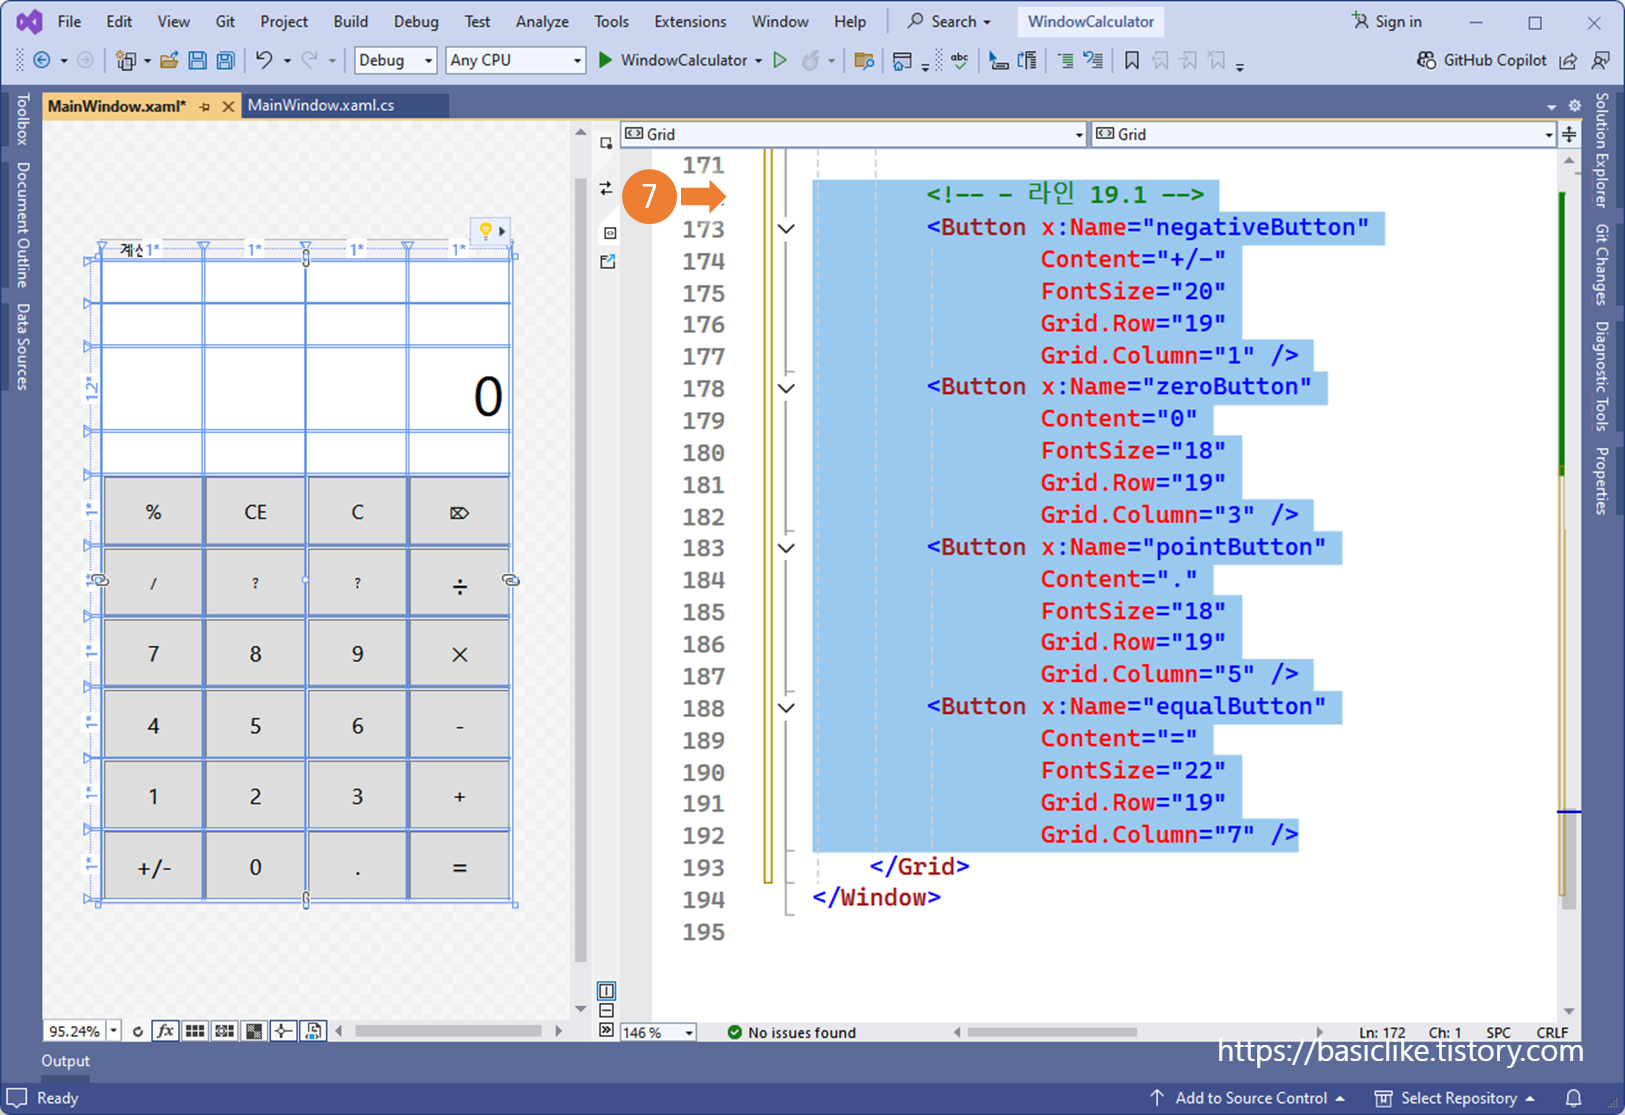
        <!-- - 라인 19.1 -->
        <Button x:Name="negativeButton"
                Content="+/-"
                FontSize="20"
                Grid.Row="19"
                Grid.Column="1" />
        <Button x:Name="zeroButton"
                Content="0"
                FontSize="18"
                Grid.Row="19"
                Grid.Column="1" />
        <Button x:Name="pointButton"
                Content="."
                FontSize="18"
                Grid.Row="19"
                Grid.Column="1" />
        <Button x:Name="equalButton"
                Content="="
                FontSize="22"
                Grid.Row="19"
                Grid.Column="1" />
04. Calculator 예제 준비하기
04.1 나눗셈 기호
Content="÷"
04.2 곱셈 기호
Content="✕"
04.3 삭제 기호, 유니코드

❶삭제 버튼과 유사한 ❷ 유니코드 추가
                FontSize="14"
                Content="⌦"
❸ 버튼 속성의 Transform의 두번째 탭에 Angle 속성을 180으로 설정후 저장하면, ❹ <Button.RenderTransform>에 해당하는 태그가 자동으로 추가된다. Content 속성값 출력이 방향이 180도 바뀐다.
        <Button x:Name="deleteButton"
                Content="⌦"
                FontSize="14"
                Grid.Row="9"
                Grid.Column="7"
                RenderTransformOrigin="0.5,0.5">
            <Button.RenderTransform>
                <TransformGroup>
                    <ScaleTransform />
                    <SkewTransform />
                    <RotateTransform Angle="180" />
                    <TranslateTransform />
                </TransformGroup>
            </Button.RenderTransform>
        </Button>
04.4 등호 기호 배경색 변경

❶ 윈도우 계산기의 등호 아이콘은 배경색이 푸른색이다.
❷ 버튼 속성의 Brush 탭에서, Backgroud 속성의 ❸ 다섯번째 탭을 선택하면, 기존에 세팅된 색이 보인다.
❹ MenuHighlightBrushKey 색을 고르고 저장하면, 자동으로 XAML에 반영된다.
04.5 등호 기호 글자색 변경

❶ 윈도우 계산기의 등호 아이콘은 글자색이 하얀색이다.
❷ 버튼 속성의 Brush 탭에서, Foregroud 속성의 ❸ 두섯번째 탭을 선택하면, 색을 고를 수 있다.
❹ 하얀색(#FFFFFFFF) 색상코드를 입력하고 저장하면, 자동으로 XAML에 반영된다.
05. Calculator 예제 준비하기
05.1 XAML에 수학 기호 표시를 위한 외부 라이브러리 찾기
WpfMath 2.1.0
.NET library for rendering mathematical formulae using the LaTeX typsetting style, for the WPF framework.
www.nuget.org
03.2 NuGet 패키지 설치
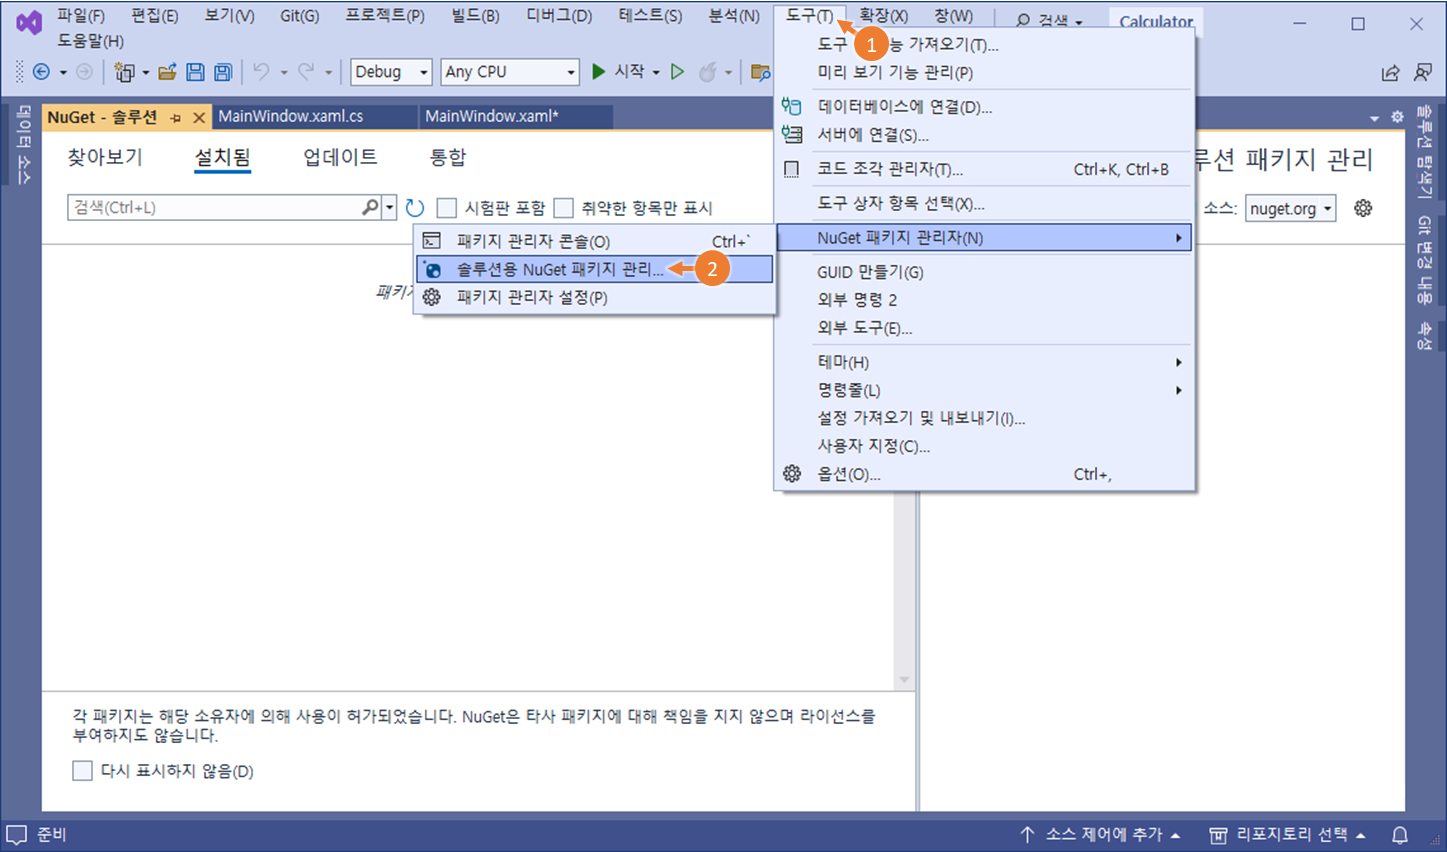
① Visual Studio 상단의 메뉴에서 "도구(T)" 메뉴의
② "NuGet 패키지 관리자(N)" ⏩ "솔루션용 NuGet 패키지 관리"를 실행합니다.

③ Nuget 솔루션 창에서, "찾아보기" 탭을 선택합니다. ("설치됨"이 기본 탭이기 때문에 "찾아보기" 탭을 선택합니다.)
④ WpfMath 를 검색합니다.
⑤ WpfMath 이름으로 된 패키지를 선택합니다.
⑥ WpfMath 외부 패키지를 설치할 프로젝트를 선택하고, "설치" 버튼을 눌러 진행합니다.
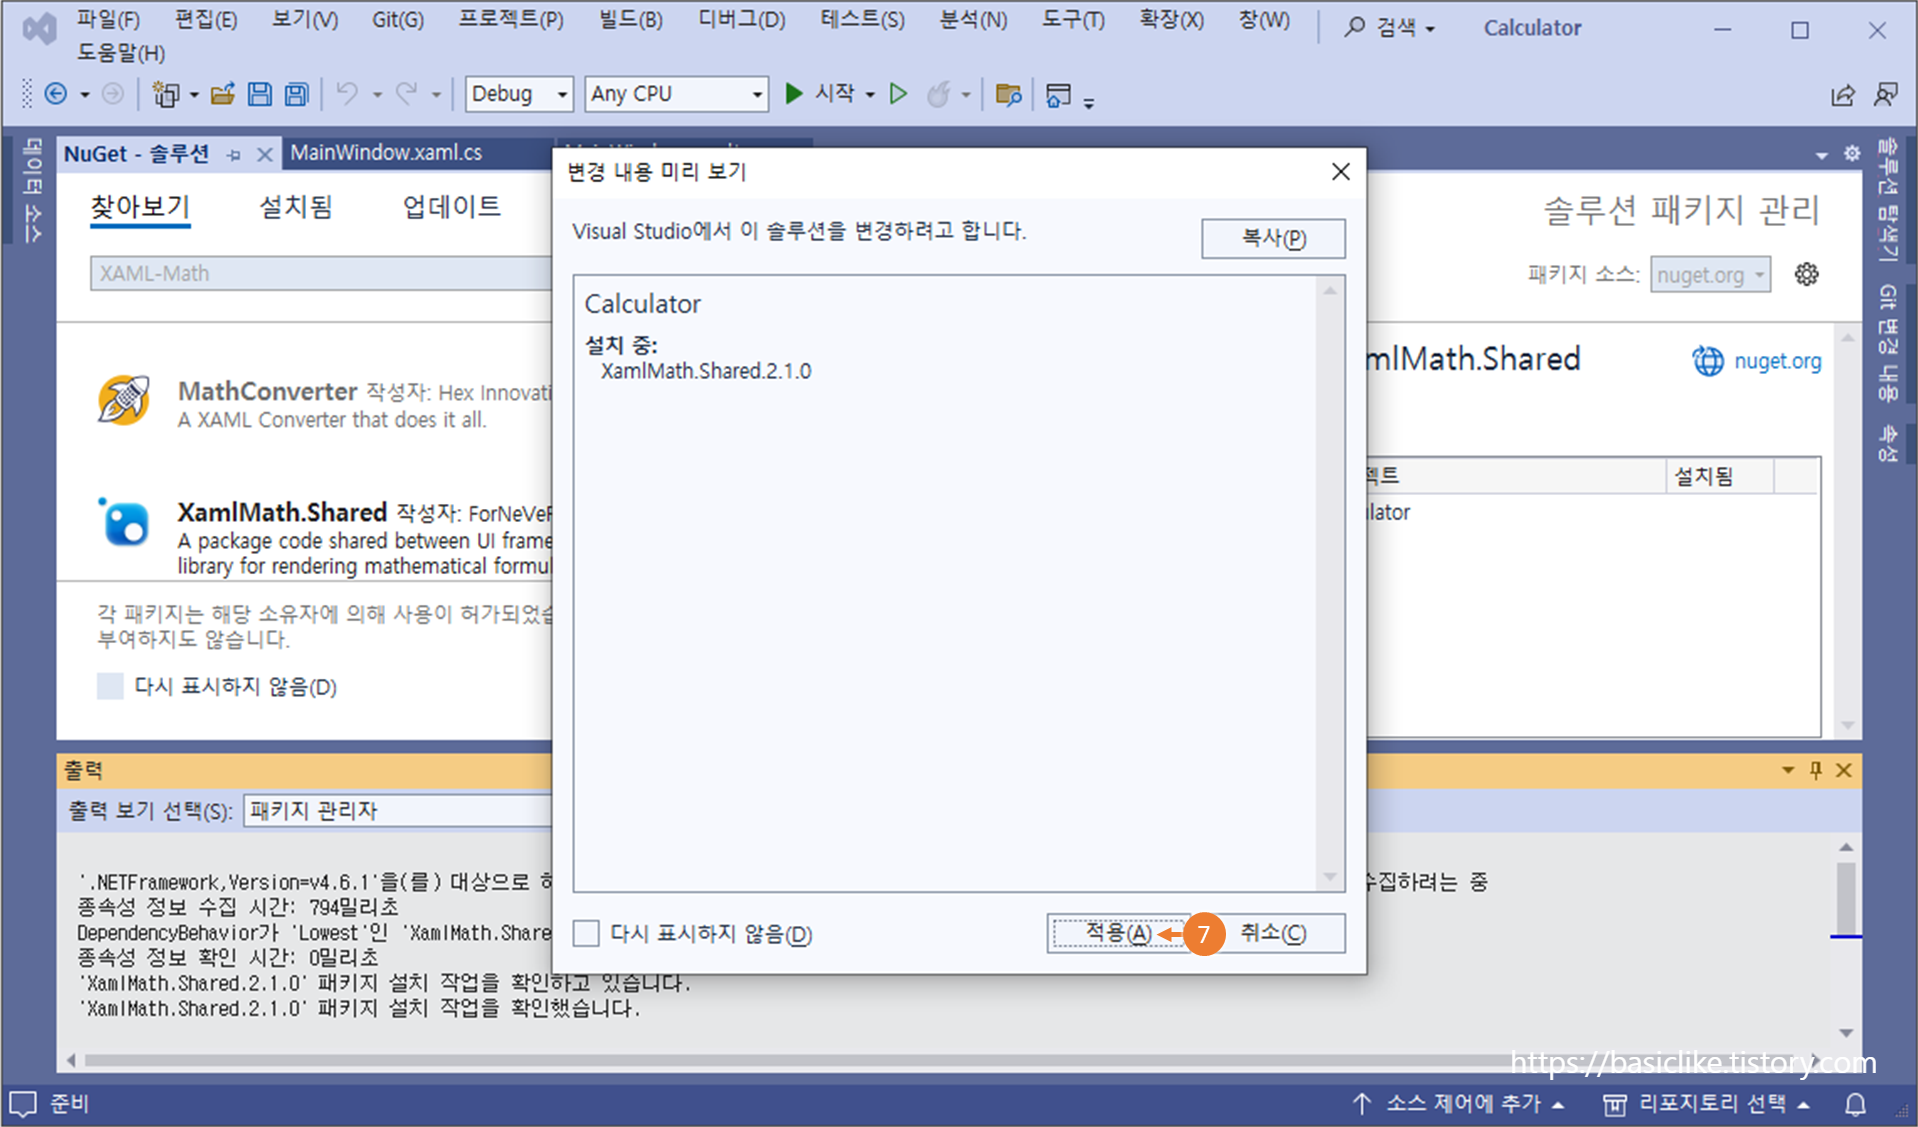
⑦ 변경 내용 미리보기 알림에서, 설치 할 패키지와 버전을 확인 후 "적용"을 눌러 설치를 진행합니다.
05.3 설치한 패키지 사용법 확인
1. XAML-Math GitHub 에서 프로젝트를 실행하면, 수학기호 사용 예제를 확인할 수 있습니다.
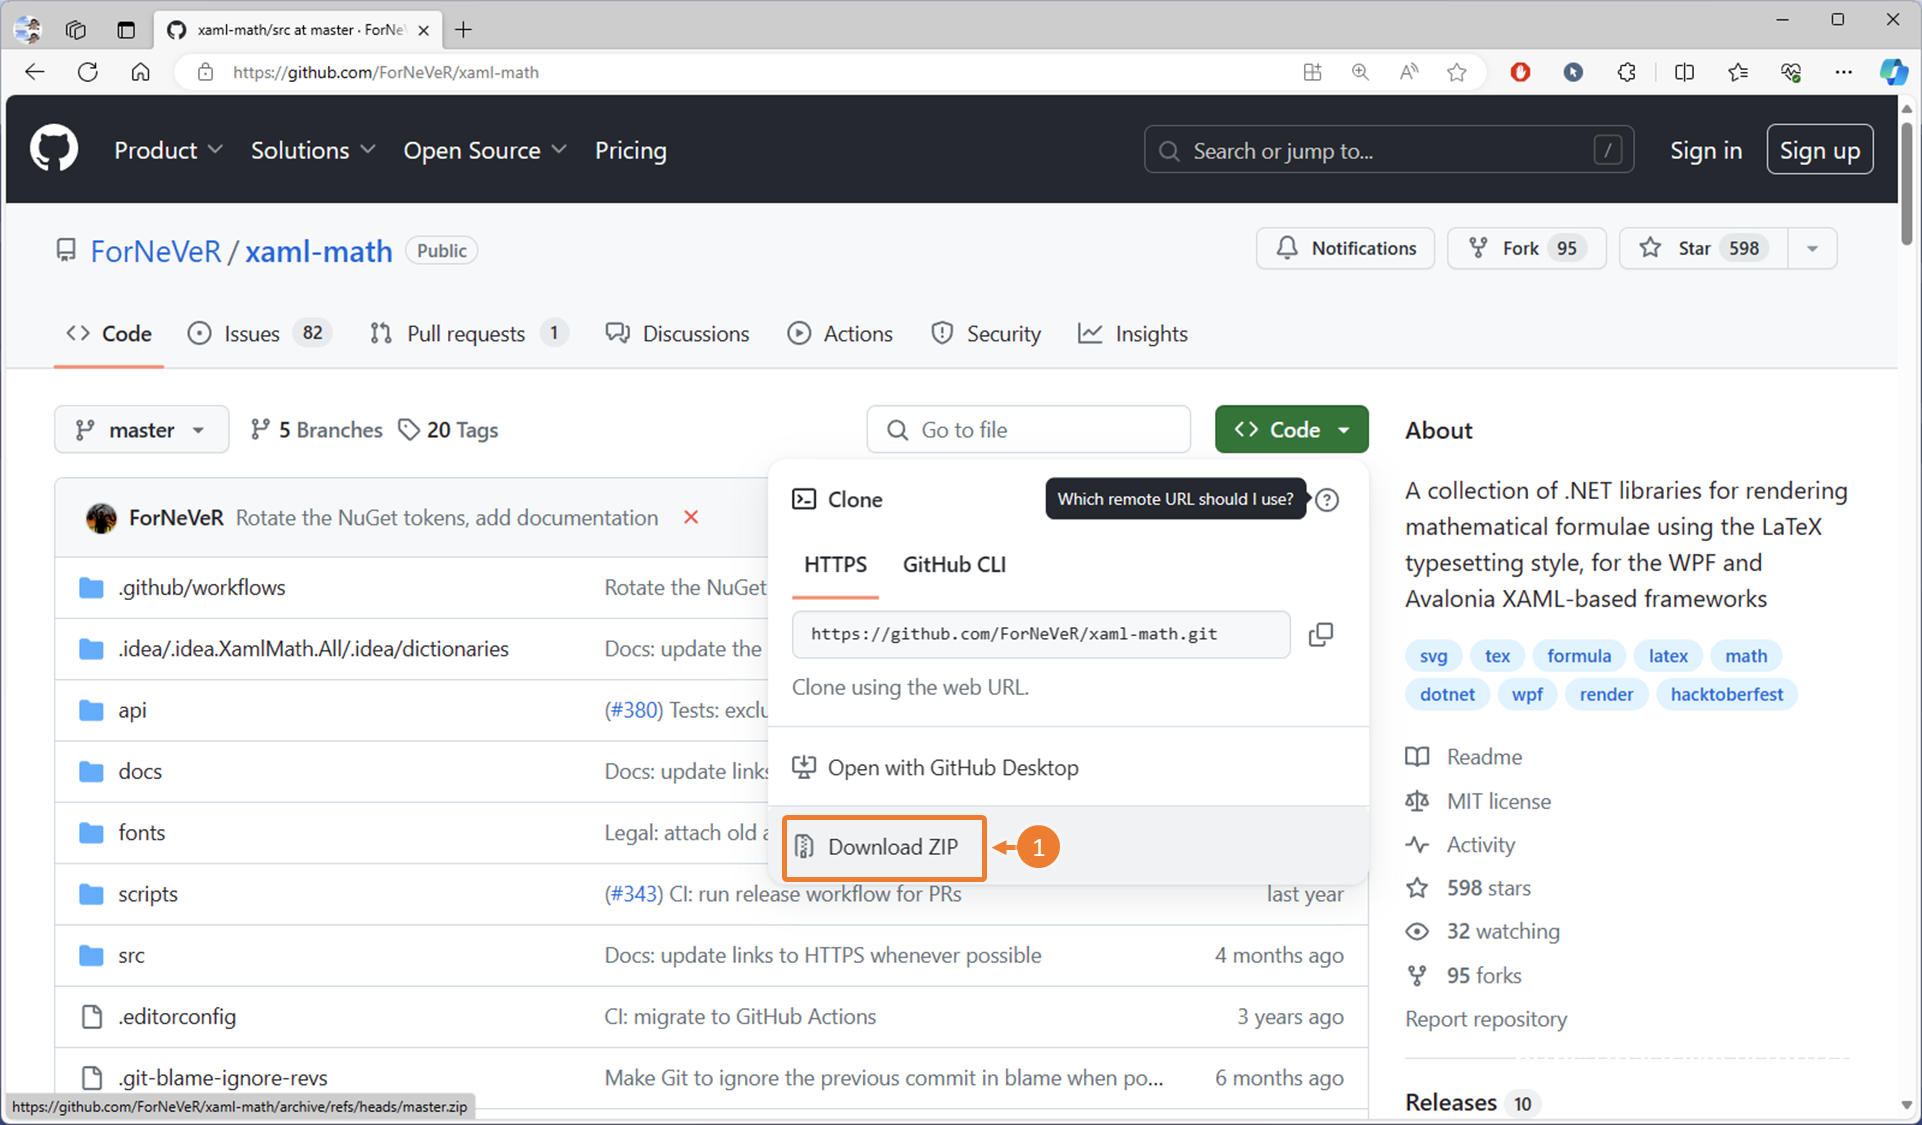


① WPF-Math GitHub 의 README 에서 wpf Math 컨트롤 태그 사용 방법에서 ① WPF 사용법에
② XAML 디자이너의 상단의 Window 태그에 추가 설치한 패키지를 참조시켜 줍니다.
xmlns:controls="clr-namespace:WpfMath.Controls;assembly=WpfMath"③ WPF-Math GitHub 의 README 에서 wpf Math 컨트롤 태그를 사용법에 맞게 추가해야 합니다.
<controls:FormulaControl Formula="1/x" />
03.4 설치한 패키지 사용하기

*xmlns = xml name space
❶ README에서 확인한 것처럼 XAML 디자이너의 상단의 Window 태그에 추가 설치한 패키지를 참조시켜 줍니다.
xmlns:controls="clr-namespace:WpfMath.Controls;assembly=WpfMath"
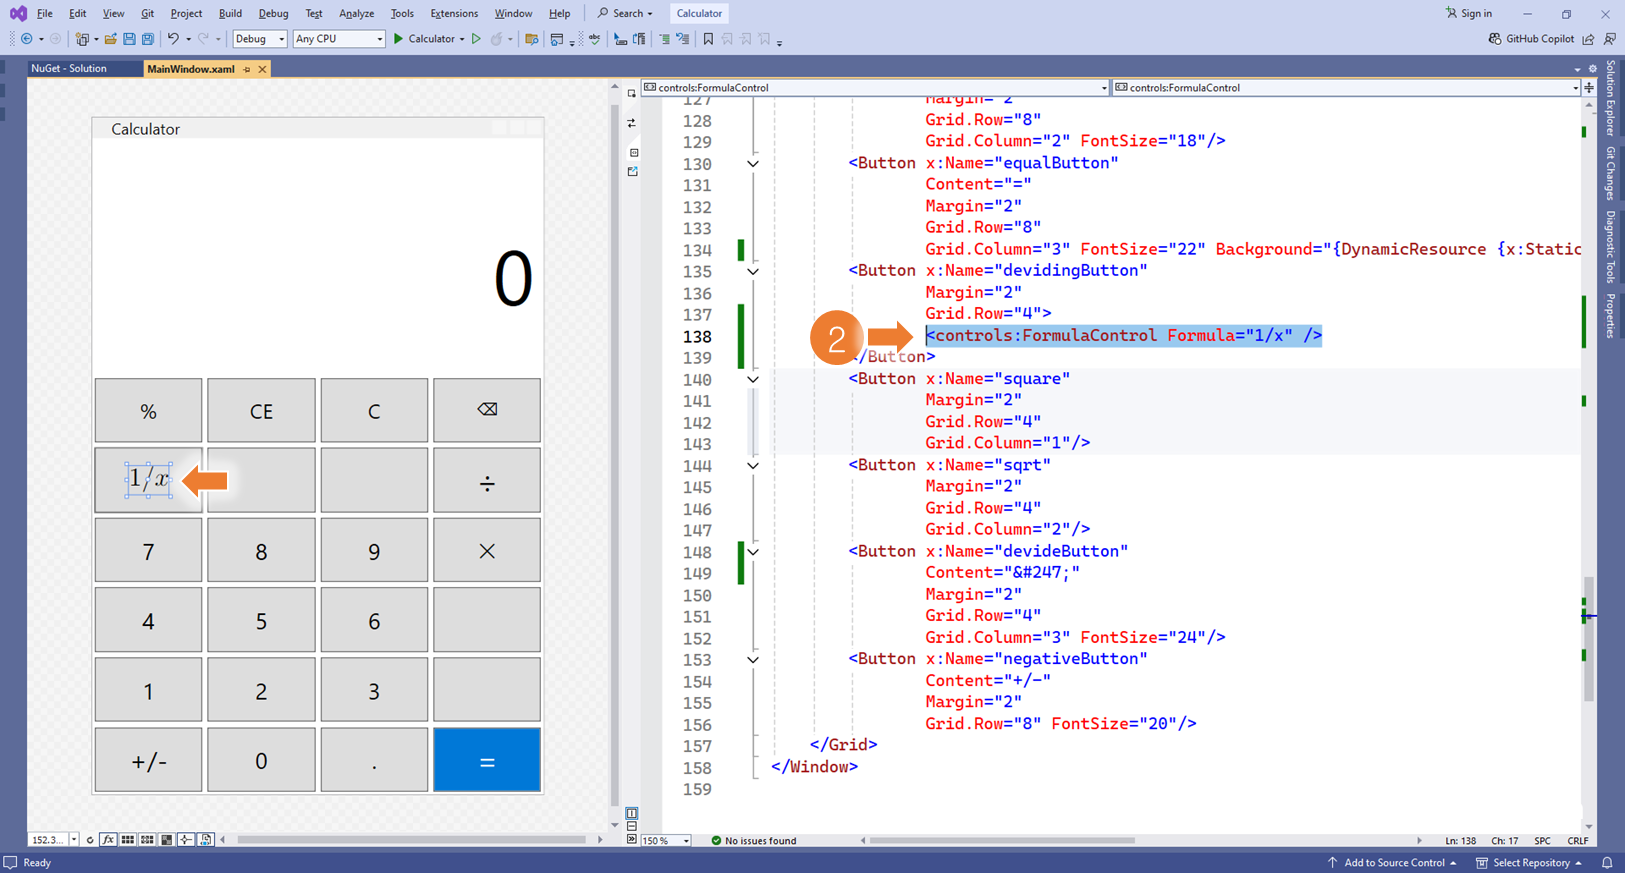
❷ 등분하는 버튼을 수정하는 경우, 버튼 태그를 다음과 같이 추가합니다.
        <Button x:Name="devidingButton"
                Grid.Row="11"
                Grid.Column="1">
                <controls:FormulaControl Formula="1/x" />
        </Button>

❸ 제곱하는 버튼을 수정하는 경우, 버튼 태그를 다음과 같이 추가합니다.
<Button x:Name="square"
        Grid.Row="11"
        Grid.Column="3">
        <controls:FormulaControl Formula="x^2" />
</Button>

❹ 버튼 태그를 다음과 같이 추가합니다.
<Button x:Name="sqrt"
        Grid.Row="11"
        Grid.Column="5">
        <controls:FormulaControl Formula="\sqrt[2]x \;" />
</Button>
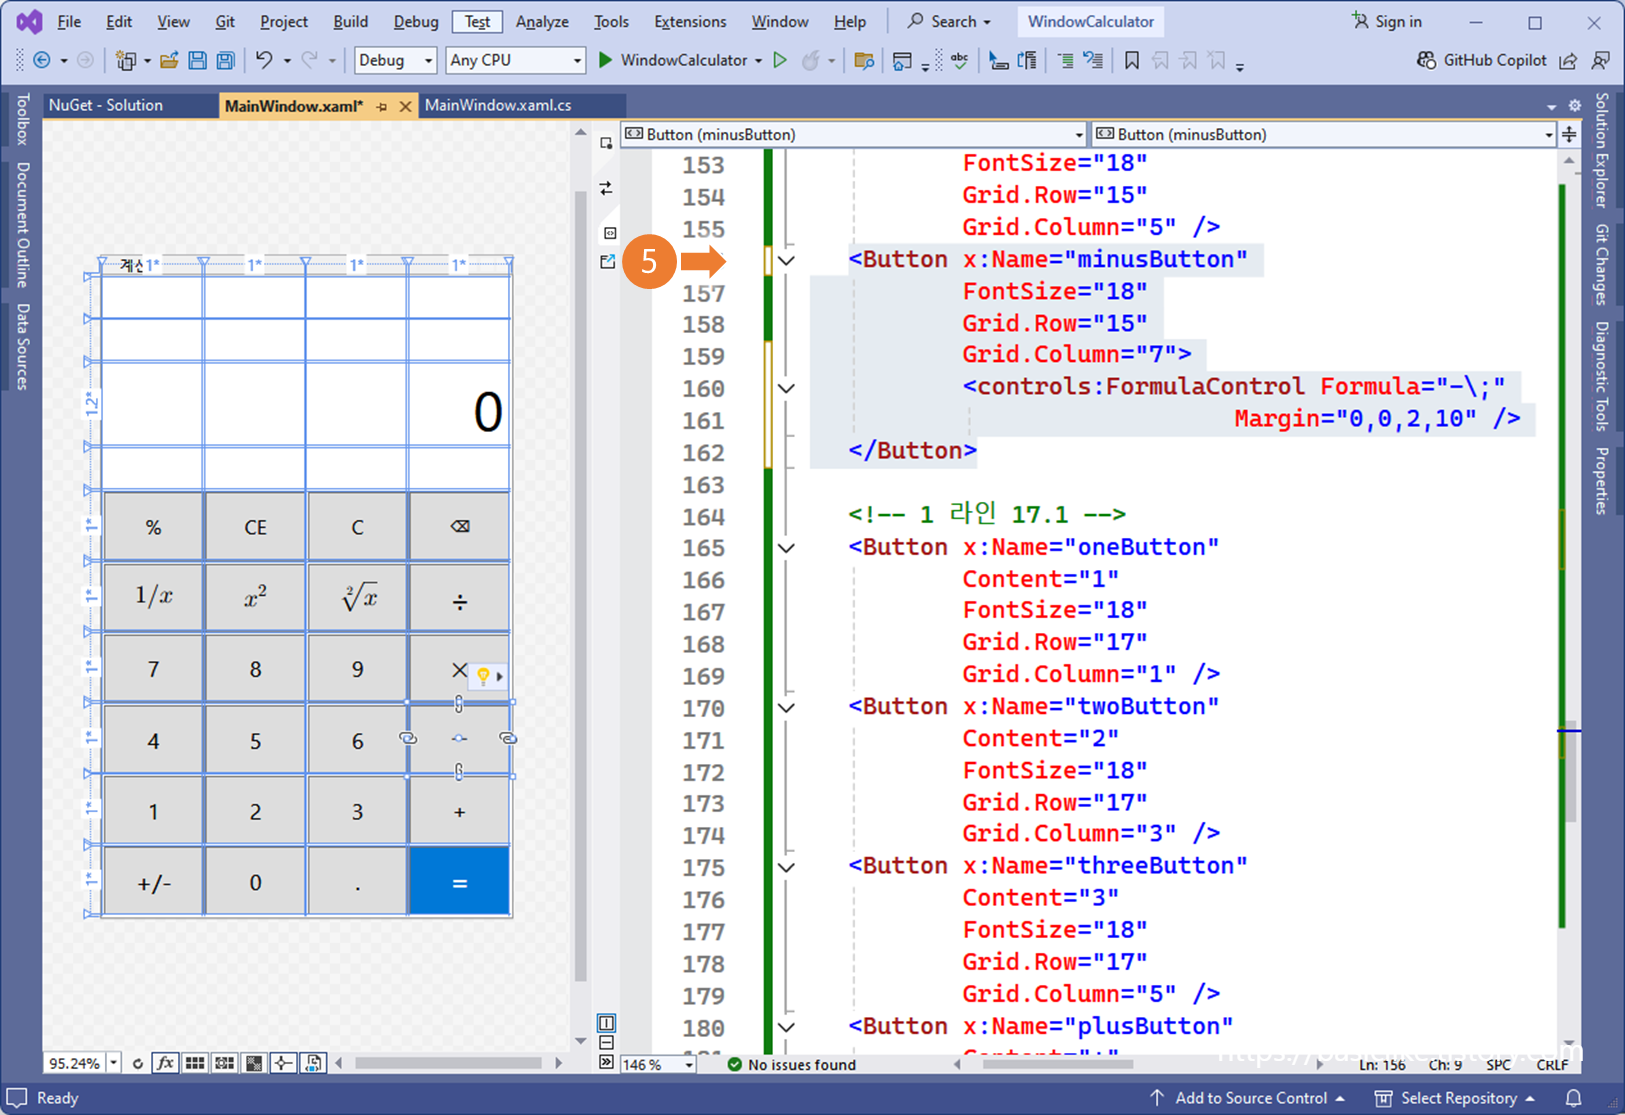
❺ 버튼 태그를 다음과 같이 추가합니다
<Button x:Name="minusButton"
        FontSize="18"
        Grid.Row="15"
        Grid.Column="7">
        <controls:FormulaControl Formula="-\;"
                           Margin="0,0,2,10" />
</Button>
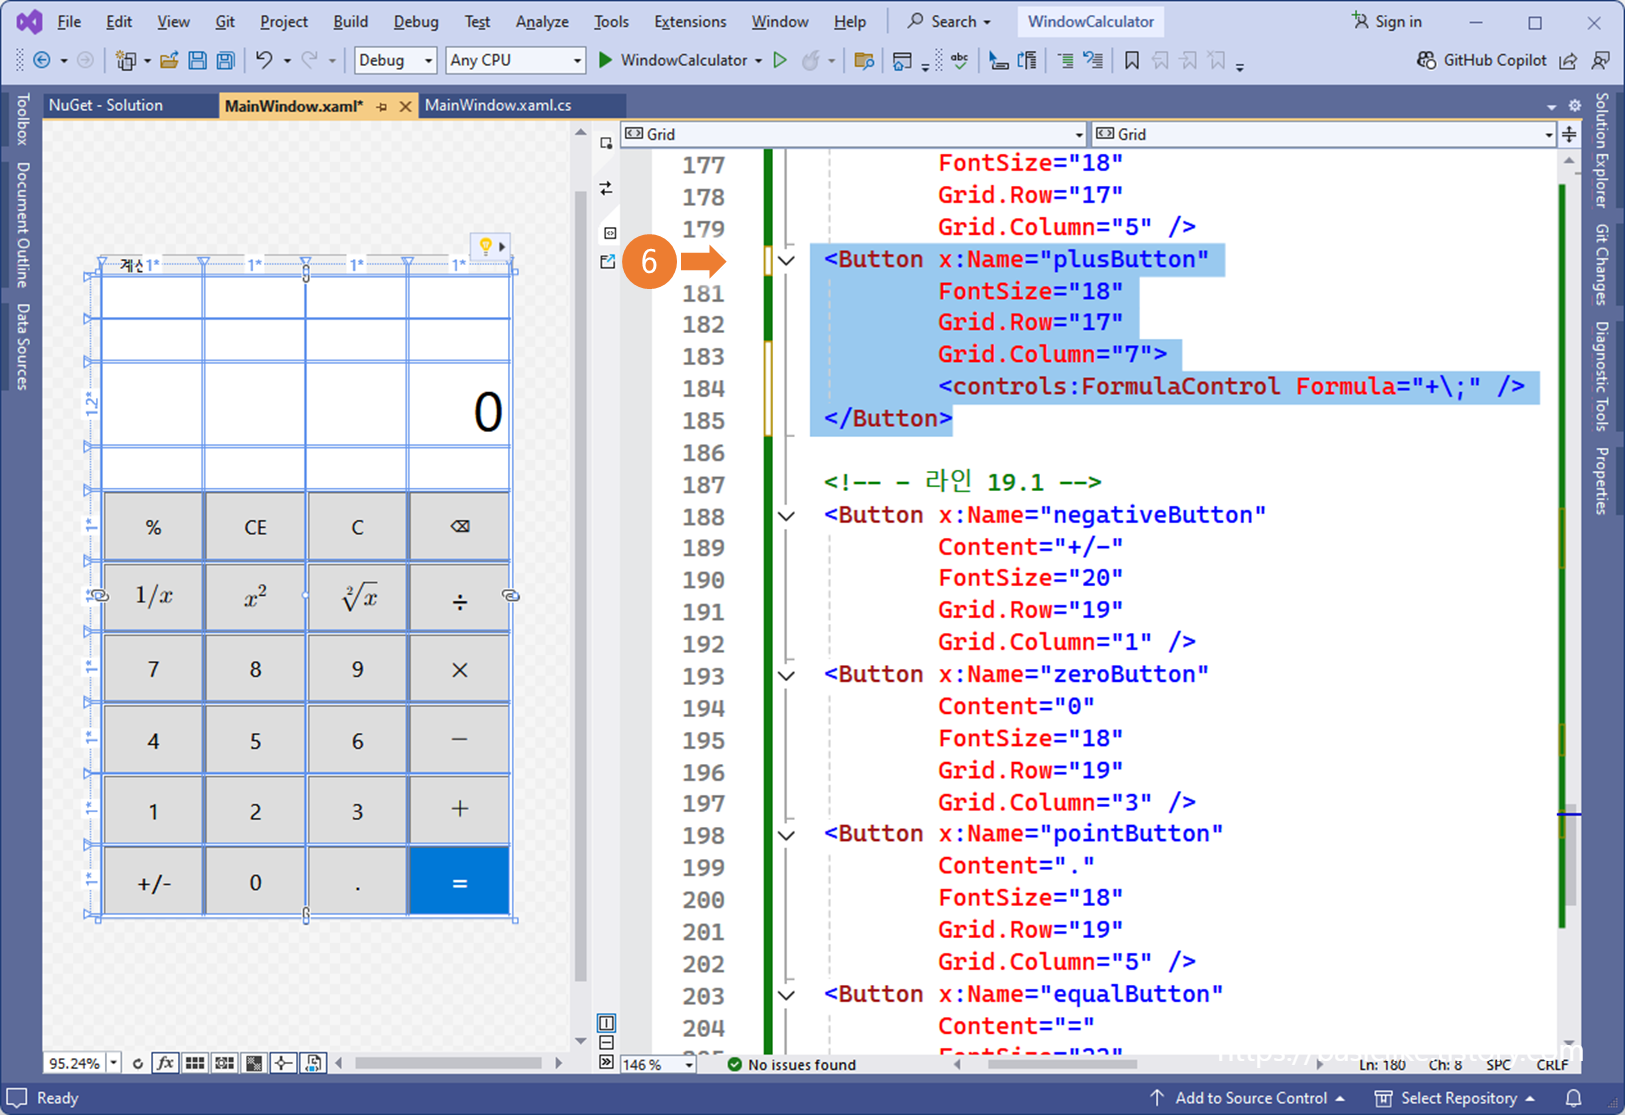
❻ 버튼 태그를 다음과 같이 추가합니다
<controls:FormulaControl Formula="+\;"/>
06. 실행 결과 확인
